Coming Soon

Tutorials-original
- Set up an account
- Add a player to your team
- Review your statistics
- Create a drill
- Create an exercise
- Help
Coming Soon
Coming Soon
In the drills you can set the poses you want your player to perform, with the help of checkpoints, values, business rules and instant feedback. You can also analyze them through your camera or by uploading videos.
Step 1 | Go to your drills
In the toolbar, select the icon of the person throwing a ball

Step 2 | Add a new drill
Select the button located in the upper right corner with the ”+” icon

Step 3 | Fill in the required fields
Enter the fields indicated on the ”setup a drill” screen

Step 4 | Create button
Hit the create button and voila!

The checkpoints will determine the comparisons you want to be made in each pose. Its creation is explained below.
Step 1 | Edit a drill
Select a drill from your list of drills

Than select the edit option
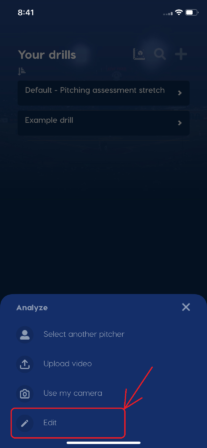
Step 2 | Checkpoints option
Select the checkpoints option, a list of the checkpoints included in your drill will be displayed here
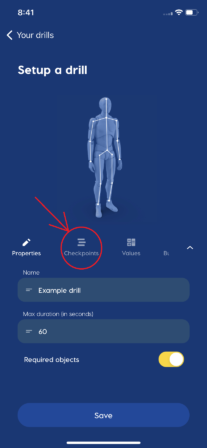
Step 3 | Add checkpoint
Go to the bottom of the list of checkpoints and select the ”add a checkpoint” option
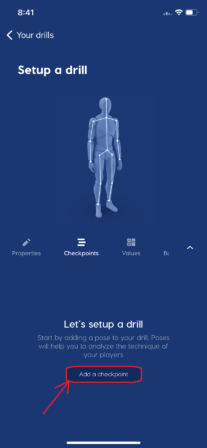
Step 4 | New checkpoint
Select the button located in the upper right corner with the ”+” icon
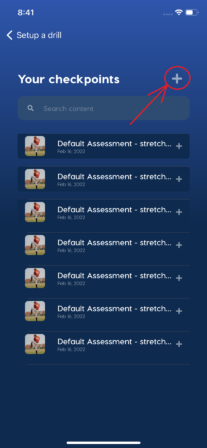
Step 5 | Edit points
You can now decide the body position you want for that checkpoint in three different ways, which are explained on the page found by clicking the button below
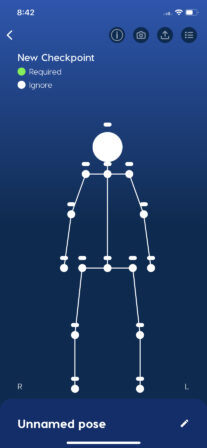
Step 6 | Name the checkpoint
Select the pencil-shaped icon placed in the lower right
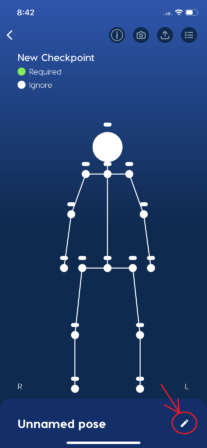
This will display a section where you can write the name of the checkpoint. Finally, click on the ”save pose” button.

Through the values you can obtain calculations that can be of great help in your analysis, such as: bodypoints, functions and operations. Its creation is explained below.
Step 1 | Go to "values"
Select the “values” option that has a calculator icon
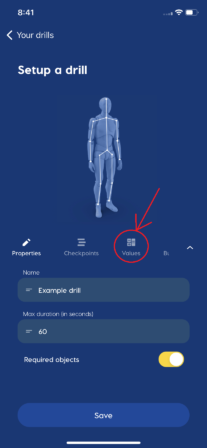
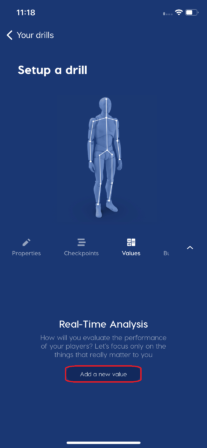
Step 2 | Add a new value
Select the option “add a new value” positioned at the end of the list of values
Step 3 | Edit value
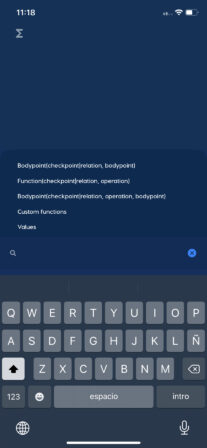
Next, you will be presented with a screen in which you can perform your own calculations, where you can insert numbers or select one of the options displayed by selecting the search bar. This is explained in more detail by clicking the button below.
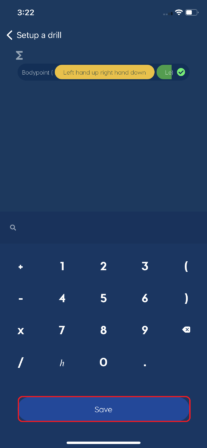
Step 4 | Save value
Select the “save” button located at the bottom of the screen
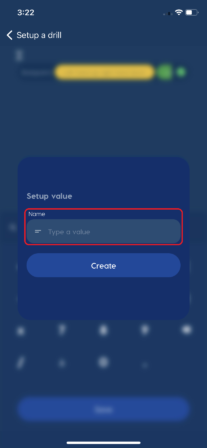
Step 5 | Setup value
Type the name you want to give your value in the box below
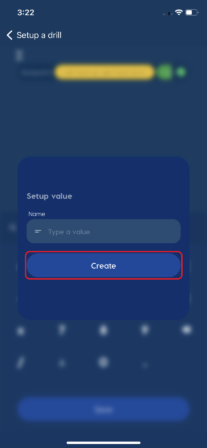
Step 6 | Create value
Select the “create” button located at the bottom of the screen and you’re done!
Coming Soon
Coming Soon
In the exercises you can set the poses you want to perform, with the help of checkpoints, values, business rules and instant feedback. You can also analyze them through your camera or by uploading videos.
Step 1 | Go to your exercises
In the toolbar, select the icon of the yoga mat

Step 2 | Add a new exercise
Select the button located in the upper right corner with the ”+” icon

Step 3 | Fill in the required fields
Enter the fields indicated on the ”setup an exercise” screen

Hit the create button and voila!

Step 4 | Your exercise
Next, in the “Your exercies” menu, there will be different options to create a exercise as accurately as possible.
Remember, the more specific the better
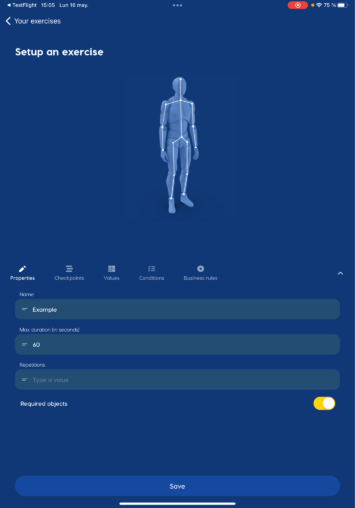
The checkpoints will determine the comparisons you want to be made in each pose. Its creation is explained below.
Step 1 | Edit an exercise
Select an exercise from your list of exercises

Then select the edit option

Step 2 | Checkpoints option
Select the checkpoints option, a list of the checkpoints included in your drill will be displayed here
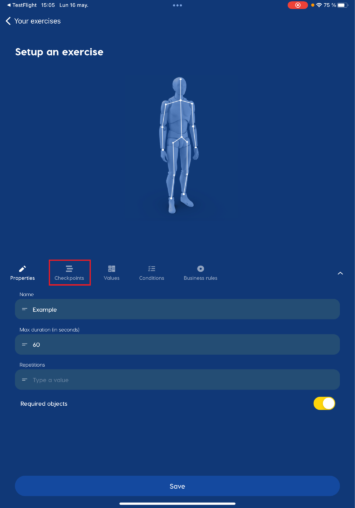
Step 3 | Add checkpoint
Go to the bottom of the list of checkpoints and select the ”add a checkpoint” option
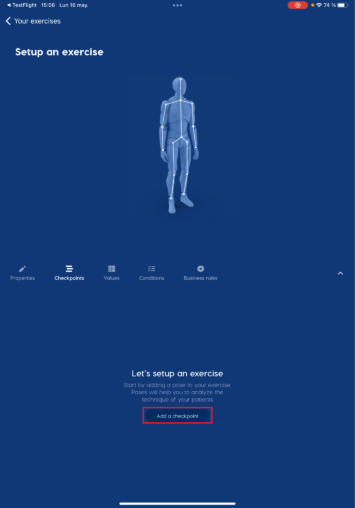
Step 4 | New checkpoint
When this menu is displayed the checkpoints in the list are default checkpoints.
Select the button located in the upper right corner with the ”+” icon.
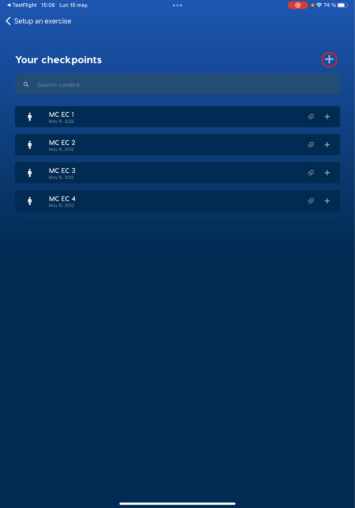
Step 5 | Type of checkpoint
This are the checkpoints types: Poce and Voice.
Poce checkpoints: When you create the Pose checkpoint, the camera will capture your movements, so you need to do the Pose and the app will indicate when you did it.

Voice checkpoints: The name will be set by you. The way it works is that the app is waiting for you to say the words you set up. So, if you write “go” and add it to your exercises you need to say it.

Step 6 | Create checkpoints
You can now decide the body position you want for that checkpoint in three different ways, which are explained on the page found by clicking the button below
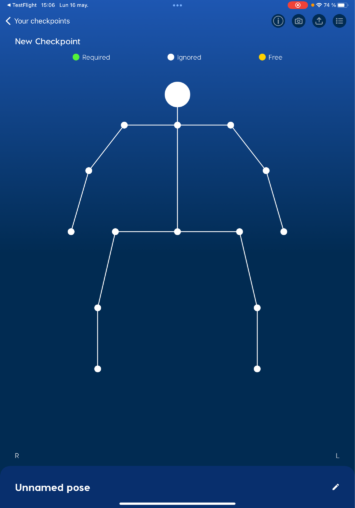
Step 7 | Name the checkpoint
Select the pencil-shaped icon placed in the lower right
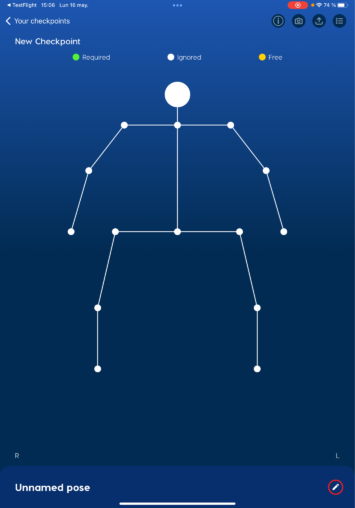
This will display a section where you can write the name of the checkpoint. Finally, click on the ”save pose” button.
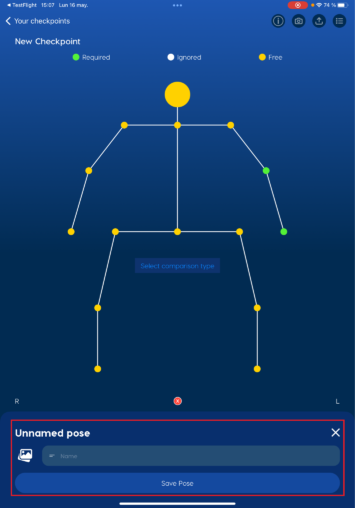
Step 8 | Add checkpoints to your Exercises
After you create a checkpoint, you need to add it to your drill. Select the button located at the end of the checkpoint you want to add with the ”+” icon
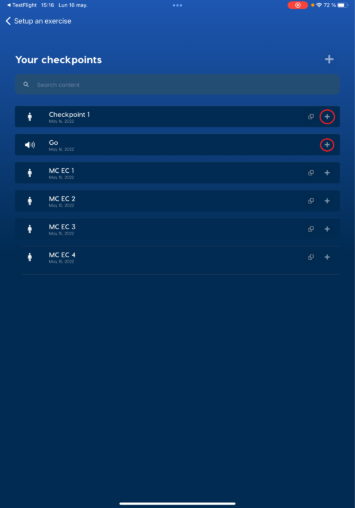
Then it will take you back to the checkpoint option menu with the checkpoint you recently added to your Exercise
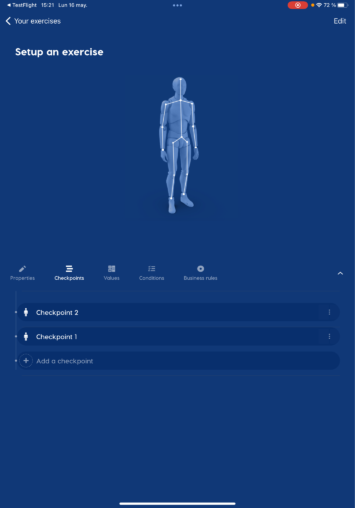
You can always add another checkpoint with the button “Add a checkpoint” at the end of the list
Step 9 | Change the order of the checkpoints in your Exercise
On the upper right tap select”Edit” button
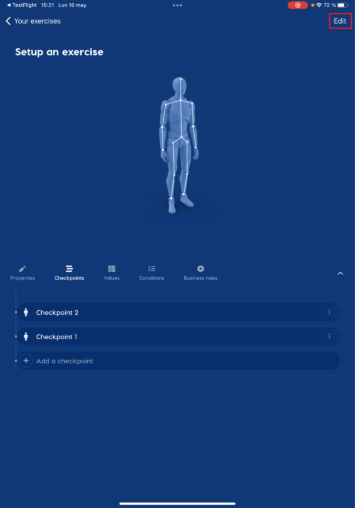
At the end of every checkpoint will appear a three line icon. Slide the checkpoint and order it as you wish
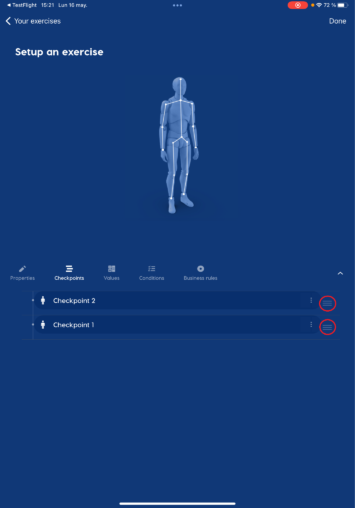
When you end tab the “Done” button.
With the relations you can create sets of checkpoints
Step 1 | Go to "checkpoints"
Every checkpoint has the three dot icon at the end of the it, then select that button
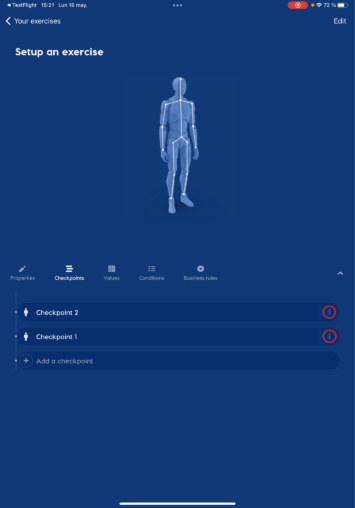
In this menu select the “Add relation” option
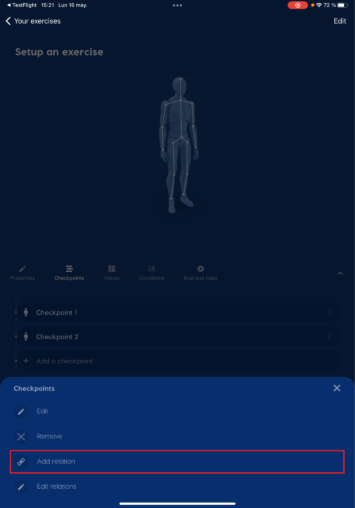
Step 2 | Select the checkpoints you want to relate
When you select a checkpoint to create a relation, this will be the head of the relation. Select the “Add checkpoint” button
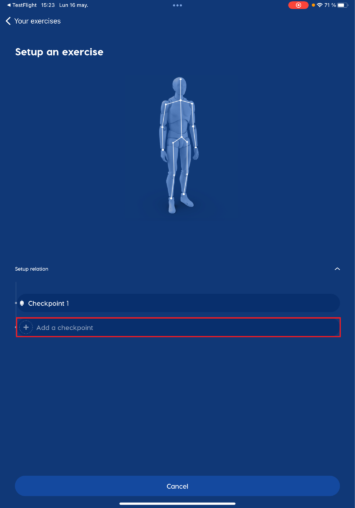
Then select another checkpoint to create the relation

After, select the “Save” button and a message of success will appear
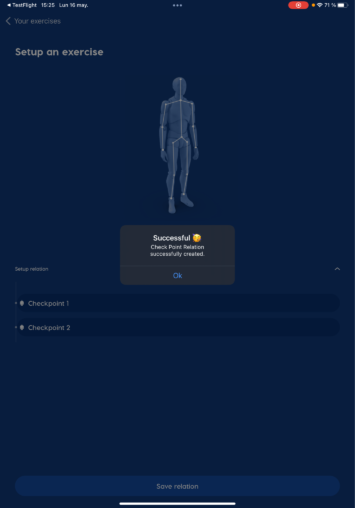
Step 3 | Checkpoint created! Necesito la imagen de la relación agregada en la lista de checkpoints
The relation will be created

And it will be added in the checkpoints list

Note | Edit checkpoint order
After you create a Relation, you can’t change the order of the checkpoints

Note | Delete a checkpoint
Yan can also delete a relation by slide it to the left

Through the values you can obtain calculations that can be of great help in your analysis, such as: bodypoints, functions and operations. Its creation is explained below.
Step 1 | Select the "Add relation" option
Select the “values” option that has a calculator icon

Step 2 | Add a new value
Select the option “add a new value” positioned at the end of the list of values

Step 3 | Edit value
Next, you will be presented with a screen in which you can perform your own calculations, where you can insert numbers or select one of the options displayed by selecting the search bar. This is explained in more detail by clicking the button below.

Step 4 | Save value
Select the “save” button located at the bottom of the screen

Step 5 | Setup value
Type the name you want to give your value in the box below

Step 6 | Create value
Select the “create” button located at the bottom of the screen and you’re done!

Coming Soon
Coming Soon
Send us a question or a suggestion for a new tutorial video through our Contact Us page!


